Cast Iron Skillet Peach and Pecan Cobbler

peaches

A cast iron skillet is the most versatile piece of cookware you can own. You can use it on the stovetop, in the oven, over a campfire, or even on a grill. You can fry in them, make casseroles in them, or even bake in them. I will make corn bread in nothing but a cast-iron skillet.

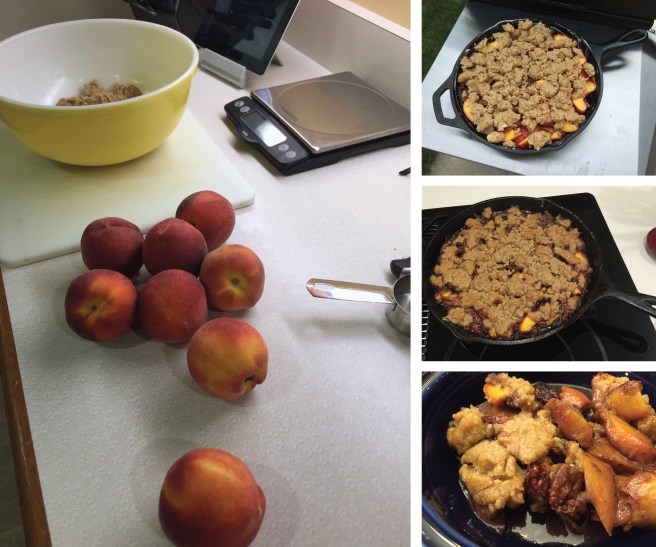
Here is a recipe I created for a Cast Iron Skillet Peach and Pecan Cobbler. I baked mine on my gas grill. The directions I am sharing are for an oven. Yeah, I include a little rye whiskey in the recipe. You can use bourbon or omit whiskey if desired. Increase lemon juice to three tablespoons if omitting.

Cast Iron Skillet Peach and Pecan Cobbler

Ingredients

Topping

1 cup all-purpose flour
cup packed light brown sugar
½ teaspoon kosher salt
½ cup chilled unsalted butter, cut into pieces

Filling

cups pecans
2 tablespoons unsalted butter, room temperature
pounds peaches, cut into ½-inch wedges, approximately 6 to 8 depending on size
½ cup packed light brown sugar
¼ cup granulated sugar
1 Lemon, juiced
1 Tablespoon rye whiskey or bourbon
1/8 teaspoon ground ginger
1/8 teaspoon ground coriander
1/8 teaspoon cumin
1/8 teaspoon nutmeg
½ teaspoon kosher salt

Directions

Topping

Add flour, brown sugar, and salt in a medium bowl and mix until well combined. Add butter. Rub the butter into the dry ingredients with your fingers until clumps form and no dry spots remain.

Filling

Preheat oven to 350°.

Toast pecans in the oven on a rimmed baking sheet until slightly darkened in color about 8 to 10 minutes. Shake the baking sheet tossing the pecans every couple minutes to prevent from burning. Cool slightly then chop coarsely.

Add the pecans, peaches, brown sugar, granulated sugar, lemon juice, rye whiskey, ginger, coriander, cumin, nutmeg and salt in a large bowl and mix well ensuring peaches and pecans are well distributed.

Grease the bottom and sides of a 10″ cast-iron skillet with unsalted butter. Pour peach mixture into skillet. Crumble the topping over filling.

Bake until topping is golden brown and juices are thick and bubbling around the edges about 30 to 40 minutes.

Serve warm or at room temperature with or without vanilla ice cream.

Advertisement

Rhubarb Crisp

IMG_3150
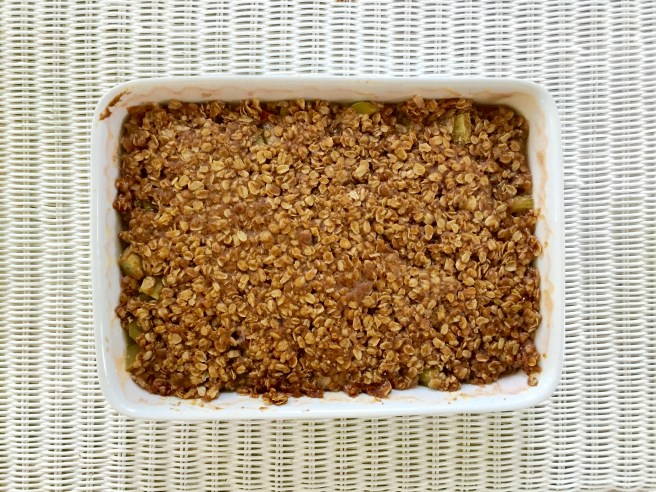
Rhubarb has an identity crisis. Botanically it is a vegetable, however most people think of it as fruit. Even the United States government defines it as a fruit following a 1947 customs court ruling. Regardless, I enjoy it’s tangy, mouth puckering goodness.

IMG_3165One of my favorite ways to enjoy rhubarb is baked in a crisp. My mother would make them frequently in the spring.

There is nothing better than a slightly warm serving of rhubarb crisp topped off with some fresh heavy cream. My mother grew up on a farm with dairy cows and I was often reminded of her having to milk thirty-five of them twice a day by hand.

I made a rhubarb crisp today and thought of my mother and those thirty-five milk cows.

Here is what I did:

Rhubarb Crisp

Ingredients

3/4 Cup sugar
3 Tablespoons cornstarch
3 pounds of rhubarb chopped into about 1 inch pieces (8 cups)
2 1/2 Cups old fashioned rolled oats (Quick cooking work too.)
1 Cup packed brown sugar
1 Cup melted butter
2/3 Cup all purpose flour
2 Teaspoons ground Cinnamon

Directions

In a large bowl, combine sugar and cornstarch. Add rhubarb and toss to coat. Spoon into a 12″ x 9″ baking pan.

In a small bowl, combine the oats, brown sugar, butter, flour and cinnamon until well mixed.

Spread over rhubarb. Bake at 350° for 50 – 55 minutes or until bubbly and fruit is tender. Let cool, but best served when still slightly warm.

Savory Spinach Pie

IMG_2871
A slice of spinach pie

My favorite farmers’ market in the Cedar Rapids area, the Hiawatha Farmers’ Market, opened this past weekend and I stopped by to say hello to some of my friends.

This market is my favorite because it opens the earliest in the year and is the last to close in the area. It is also just the right size. It isn’t filled with the craziness of the Downtown Farmers’ Market which is more a place to be seen and not a farmers’ market. I build relations with the growers at Hiawatha which is what a market should be.

IMG_2869
Spinach pie cooling after coming out of the oven.

This visit to the year’s first market was simply to reacquaint myself with the vendors. I didn’t buy anything this visit as the offerings were mostly bedding plants. Some of the vendors have large green houses and so they were able to offer some items like lettuces and other greens as well as hot house tomatoes.

One green I am really looking forward to is fresh spinach and that got me thinking; I’m hungry for spinach pie.

Not finding any spinach at the market and a few days latter when this craving became an obsession, I did the next best thing. I went to the organic section of my grocery and bought a couple pounds of spinach. Craving satisfied.

Here is what I did:

Savory Spinach Pie

Ingredients

3 tablespoons olive oil
1 medium yellow onions, finely chopped
Sea salt
Freshly ground black pepper
2 pounds fresh spinach, larger stems removed, washed and thoroughly dried (See note)
8 ounces Gruyère cheese, grated
3 large eggs (one egg is used for an egg wash)
1 cup heavy cream
1/4 teaspoon fresh ground nutmeg
Pie crust for double crust pie

Directions

Preheat oven to 375°F.

Add the olive oil to a large skillet and sauté the onion and garlic over medium-high heat until the onion is translucent and beginning to soften. Season with salt and pepper. Add about 1/4 of the spinach, or whatever will fit in your skillet, and sauté until it cooks down. Repeat this until all the spinach is wilted. Continue cooking until most of the liquid is cooked out, about 10 to 12 minutes. Place spinach in a sieve and press the spinach to remove as much of the remaining liquid as possible. Set aside.

Whisk the cream, 2 eggs, and nutmeg together in a suitable bowl and set aside.

Fit the bottom crust in a 10″ pie pan. Layer half the spinach mixture in the bottom crust and then layer half the grated cheese. Repeat layers. Pour cream and egg mixture over spinach and cheese. Fit top crust over the pie and crimp the edges together. Beat remaining egg in a suitable bowl and brush over top crust with a pastry brush. Slit the top crust with a sharp knife to create steam vents.

Bake in 375F oven for 45 to 50 minutes and crust is golden brown. Remove from oven and allow to cool at least 30 minutes.

Note: You may substitute 2 10 ounce packages of frozen spinach for fresh. If you choose to do this, thaw and squeeze out as much liquid as possible. After you have sautéed the onion and garlic, add this to the skillet to warm though and incorporate the onion and garlic.

Springerle Cookies: An old-fashioned anise flavored cookie

image

My most favorite Christmas cookie is the polarizing Springerle cookie; you either love them or you hate them. You tend to like them if you like the flavor of anise and black licorice. If not, they typically aren’t for you.

I refer to Springerle as an old-fashioned cookie because of two of the ingredients used: anise oil and bakers ammonia. Both ingredients are very hard to find and can be quite pricey. My mother would need to special order these two ingredients from the pharmacy in the small Iowa town I grew up in. I order mine online from King Arthur Flour.

Bakers ammonia, also know as ammonium carbonate or hartshorn, quickly becomes gaseous ammonia and carbon dioxide when heated which is why it makes a great leveling agent. It is the predecessor to the more modern leveling agents of baking soda and baking powder.

Springerle cookies were the first Christmas cookies my mother would make each year. This is because springerle cookies should age a few weeks in order for them to develop their unique hardness. This also allows the flavor of the anise to mellow. Done correctly, these cookies will remain light and airy though harder than most cookies. You may bake these cookies closer to Christmas if you prefer a softer cookie. You can also place a slice of soft bread in the storage container.

Here is the recipe handed down to me from my mother:

Springerle Cookies

Ingredients

4 Eggs
1 Pound powdered sugar
1 Tablespoon water
½ Teaspoon anise oil
¾ Teaspoon bakers ammonia
½ Teaspoon salt
4 (1 pound 1 ounce) Cups all-purpose flour

Directions

Mix all ingredients, except flour, together and beat one-half hour at the number 5 or medium speed in stand mixer. Gradually add flour to form a stiff dough. If too loose or sticky, add more flour no more than a tablespoon at a time. Turn dough out on cold surface and roll out to about ¼ inch thick with standard rolling pin. Next use pattern springerle rolling to imprint design into dough. Cut dough apart following horizontal and vertical lines imprinted by rolling pin. Move cut cookies to a cool room and let stand overnight or at least eight hours.

After aging the cookie dough, pre-heat oven to 325° F. Grease a cookie sheet with shortening. One by one, place a small drop of water on the under side of each cookie and place on greased cookie sheet. Bake 10 to 12 minutes. Cookies will puff up and the bottoms will slightly brown. The tops will remain somewhat pale.

Notes: I like to roll my cookies out on a very well chilled marble cutting board. This allows me to work with a smaller amount of dough and to cool the cutting surface down. My directions call for aging the cookies overnight in a cool room. A cool room would be a room that is between 50 to 60 degrees or so. Do not place in a refrigerator as you want some air circulation. A refrigerator may cause condensation to form on the cookies.

A Fun, Decadent Dessert: Baked Hot Chocolate

image
Baked Hot Chocolate right out of the oven.

image
Baked Hot Chocolate served with lightly sweetened whipped cream.

I love the holidays filled with fun, festivity, and food. It’s a time when I have an excuse to cook for friends and family. What better way to add some fun and festivity to your holiday meals than to make your dessert out of chocolate.

This quick and easy dessert is both decadent and delicious. Although you bake these in individual mugs it is not really baked hot chocolate and I can’t help but like the play on words for this dessert. Part very moist brownie, part pudding, this is one of the most amazing dessert concoctions I have ever created. They are relatively quick, very easy, and extremely rich – the most perfect way to end just about any meal.

This recipe will make four desserts.

Ingredients

9 ounces high-quality semisweet chocolate, finely chopped
6 tablespoons unsalted butter, cut into cubes
4 large eggs
¼ cup granulated sugar

Lightly sweetened whipped cream, to taste (optional)

Directions

Preheat oven to 350 degrees. Arrange four 1-cup ovenproof coffee cups, mugs or 8-ounce ramekins in a baking or roasting pan.

Melt chocolate and butter together in a double boiler set over barely simmering water. Whisk occasionally until smooth. Remove from heat and set aside.

Stir eggs and sugar together in a mixing bowl, then set bowl over simmering water. Stir until warm to the touch.

Remove from heat. Beat egg mixture with an electric beater until light and fluffy, 3-5 minutes. Gently fold egg mixture into chocolate mixture.

Spoon batter into cups. Add enough very hot water to baking pan to come halfway up sides of cups. Bake until the tops lose their glossy finish, 15-20 minutes. Carefully remove cups from pan.

Serve warm or at room temperature with a generous dollop of whipped cream, if desired. Puddings may be refrigerated for up to one day. To reheat, bring them to room temperature and then set in a 350-degree oven until warm, about 5 minutes.

There’s an app for that: Brie en Croute


Brie en Croute after being cut open exposing all that gooey goodness.

Although Brie en Croute is enjoyed year round, I associate it with Christmas and holidays as it just seems so festive. The fillings you can use are limited only by your imagination; everything from a raspberry and almond to a pepper jelly and pecan filling to an olive and garlic compote. The Brie en Croute pictured above has a filling of a Scotch Bonnet pepper jelly and pecans.

Making a Brie en Croute is almost too easy; especially if you purchase your puff pastry. Here’s a video demostrating how to make puff pastry should you decide to make your own. It really isn’t too hard but it is time consuming: puff pastry. It is originally in French but has been overdubbed.

Here’s what I did to make the Scotch Bonnet pepper jelly and pecan Brie en Croute:

Ingredients

1 egg
1 tbsp. water
All-purpose flour
12″ x 12″ sheet of puff pastry or1 sheet of frozen puff pastry, thawed.
¼ cup chopped pecans
½ cup Scotch Bonnet pepper jelly
1  Brie cheese round (approximately 8 ounces)

Directions

Preheat the oven to 400°F. Make an egg wash by beating the egg and water in a small bowl with a fork.

Sprinkle the flour on the work surface.  Unfold the pastry sheet on the work surface and roll the pastry sheet into a 12 x 12 inch square. Cut the corners off the sheet of puff pastry to form a circle. Next, spread the pecans in the very center of the pastry in the approximate size of the Brie wheel. I like to take the outer container of the Brie and center it in the middle of the pastry and then lightly tap it giving me a guide to the size of the Brie wheel. Spread the jelly on top of the pecans and then place the Brie wheel on top of the jelly. Using a pastry brush, brush some of the egg wash on the outer edge of the pastry and then fold the pastry up over the cheese to cover and seal. Brush a little more egg wash over the seams to help seal.  Place seam-side down onto a baking sheet lined with parchment paper. Decorate with the pastry scraps, if desired and finally brush the entire pastry with the egg mixture.

Bake for 20 minutes or until the pastry is golden brown. Let stand for 15 to 30 minutes before cutting and serve with the crackers or crostini.


Brie en Croute before cutting open. Use the scraps of puff pastry to decorate the top of your Brie en Croute.

Corn Bread from Scratch

On Sunday, I posted a recipe for my Buttermilk Pancakes made from scratch. In the post I questioned why people purchase convenience items like these since they are so easy to make from scratch. Tonight I made some black bean soup and a corn bread. The corn bread did not come from a box; and why should it?

Chances are, most people have all the ingredients for corn bread in their pantry. Why should you spend the extra money on having those common ingredients prepackaged for you?

Here’s all you need to do:

Ingredients

1 ½ C all-purpose flour
1 C cornmeal
¼ C sugar
2 t baking powder
¼ t baking soda
½ t salt
1 C milk
½ C unsalted butter, melted and cooled
1 large egg

Directions

Heat oven to 400° F. Grease 10″ cast iron skillet. Combine dry ingredients. Stir in milk, oil and egg, mixing just until dry ingredients are moistened. Pour batter into prepared skillet and bake 20 to 25 minutes or until light golden brown and wooden pick inserted in center comes out clean. Serve warm.

Additional note:

You may use a 9″ square pan instead of the cast iron skillet if you would like. I, however, prefer the cast iron skillet as it heats more evenly and gives the corn bread a crisper crust.

Buttermilk Pancakes from Scratch

image

It’s a lazy Sunday mornings and everyone in the house is in the mood for a big breakfast. Mornings like this make me smile as they give me a chance to whip up a batch of my from scratch buttermilk pancakes.

I’ve never quite understood why people purchase certain convenience foods; especially things like any of the “Helper” boxed dinners, Alfredo sauce, and today’s subject – pancake mix. It isn’t because these things are inherently terrible or necessarily bad for you; they are full of unnecessary chemicals and preservatives though. I don’t understand why simply because things like this are just not that difficult to make from scratch. In my opinion, not only do they taste much better, but you control what goes into your food. Here’s my from scratch buttermilk pancakes. You could substitute regular milk for the buttermilk or simply add a tablespoon of lemon juice to each cup of milk and let it set for at least five minutes to make your own buttermilk substitute.

Give this recipe a try. You’ll make some of the best pancakes you ever tasted. You may even start singing, “They’re so light ‘n fluffy-brown, They’re the finest in the town…”

Ingredients

1 ½ C all-purpose flour
2 T sugar
2 t baking powder
½ t baking soda
½ t salt
1 ¼ – 1 ½ C buttermilk
2 eggs
1 t vanilla
2 T vegetable oil

Directions

In a bowl, mix together all the dry ingredients. Make a well in the center and pour in the buttermilk. Start with mixing 1 ¼ cups buttermilk to the flour. Add up to another ¼ cup if necessary if the batter is too dry. Add the two eggs, vanilla, and oil, whisking until mixed but still a bit lumpy.

Heat griddle and ladle ¼ cup of pancake batter onto hot grill. When the pancake begins to bubble flip and cook a couple more minutes on the other side.

Additional note

Using a ¼ cup measuring cup to measure out the batter will result in a pancake that measures approximately 4 inches in diameter. This recipe will produce 12 to 15 4 inch pancakes. I like this size because any leftover pancakes can easily be frozen with a piece of wax paper between each pancake. They can easily be taken out of the freezer and reheated for a great mid-week breakfast. Four inch pancakes easily fit in most toasters for reheating which produces a nice crispy cake as opposed to a soggy cake reheated in a microwave.

A bit of an unusaul tart: Pecan Brie Tart

Think of a tart and you usually think of a sweet, fruit filled creation. However, the history of tarts shows a more savory beginnings. Tarts in medieval times traditionally were meat filled pastries. Over time they transformed into the sweeter fruit and custard desserts we find today.

This weekend I was given a challenge to make a dessert that contained the following three ingredients: butter, whipped cream, and brie. The first two were easy. It was the brie that caused consternation. In the end, I think I came up with an excellent sweet and savory tart. Here is what I did. This recipe will make four, four inch individual tarts.

The tart shell

Having never made a tart before, I went in search of a quick and easy tart shell recipe. I settled on David Lebovitz’s adaptation of Paule Caillat’s tart dough recipe. Caillat teaches the art of French cooking in Paris. Her recipe is a little unconventional as she begins by browning the butter and the dough is mixed while the fats are hot rather than cold as is typical. This recipe will make enough dough for a 9 inch tart pan. I used four smaller 4 inch tart pans to make individual tarts.

Ingredients

90 g (3 ounces) unsalted butter, cut into pieces
1 tablespoon vegetable oil
3 tablespoons water
1 tablespoon sugar
1/8 teaspoon salt
150 g (5 ounces) flour

Preheat the oven to 410º F.

In a medium-sized ovenproof bowl, such as a Pyrex bowl, combine the butter, oil, water, sugar, and salt.

Place the bowl in the oven for 15 minutes, until the butter is bubbling and starts to brown just around the edges.

When done, remove the bowl from oven (and be careful, since the bowl will be hot and the mixture might sputter a bit), dump in the flour and stir it in quickly, until it comes together and forms a ball which pulls away from the sides of the bowl.

Transfer the dough to a 9-inch tart mold with a removable bottom and spread it a bit with a spatula.

Once the dough is cool enough to handle, pat it into the shell with the heel of your and, and use your fingers to press it up the sides of the tart mold. Reserve a small piece of dough, about the size of a raspberry, for patching any cracks.

Prick the dough all over with the tines of a fork about ten times, then bake the tart shell in the oven for 15 minutes, or until the dough is golden brown.

Remove from the oven and if there are any sizable cracks, use the bits of reserved dough to fill in and patch them.

Let the shell cool before filling.

The filling

Ingredients

8 oz good quality brie (I used a triple cream brie)
½ cup finely chopped pecans
½ cup brown sugar (packed)
3 ounces whiskey (I used Templeton Rye)

Directions

Cut brie into 4 equal wedges and place in tart shell.

In a saucepan, heat pecans, sugar and whiskey over medium heat, stirring until bubbly. (I chose Templeton Rye because I thought the nutty, buttery flavor of the whiskey would add to the flavors of the brown sugar and pecans. I was right.)

Reduce heat and simmer for 1 minutes or until thickened.

Working quickly, spoon pecan mixture over Brie.

Bake in 375?F oven for 10 minutes or until hot and bubbly.

Because my challenge called for whipped cream, I simply whipped some heavy cream and added a dollop on top of the tarts. They would have been just as delicious without the whipped cream.

A note on whipped cream. For the life of me, I cannot understand why people buy Cool Whip when in under five minutes you can have real whipped cream without unpronounceable chemicals. All you need is to make sure your cream is very cold and a good quality whisk. It also helps to chill the bowl a few minutes too so it is also cold. Poor the very cold cream into the chilled bowl and whisk away. You will be amazed at how quickly you will have a very light and airy whipped cream.

Birthday Cake!

A few weeks ago I posted that my daughter Elizabeth asked me for my mother Loretta’s sponge cake recipe. I also mentioned that it was my favorite cake and that I always asked her to make me one on my birthday; just a plain sponge cake with no frosting.

Yesterday was my 50th birthday. My daughter Elizabeth surprised me with an unfrosted sponge cake. Loretta, you would have been proud. Yes, the picture is the cake she baked for me with the one piece I cut out for myself.

Thank you Elizabeth! I love you!

Here is a recap of the recipe:

Ingredients

3 C sifted cake flour
2 t. baking powder
1/2 t. salt
10 to 12 egg yolks
2 C sugar
1 C cold water
1 t. vanilla
1/2 t. lemon extract

Directions

Sift cake flour, baking powder, and salt together three times. Beat egg yolks in large bowl of mixer on high speed for 5 minutes until thick and fluffy. Gradually beat in sugar. Turn to low speed and beat in cold water, vanilla, and lemon extract. Then sprinkle in flour mixture quickly but not all at once. Beat only until blended.  Pour into 10” diameter, deep angel food tube pan. Bake at 350° for about 1 hour.