Loretta’s Peanut Butter Rice Krispie Ice Cream Treats

7459_10152086146388636_1702824985_n
My mother eating sweet corn at a very early West Point Iowa Sweet Corn Festival. She is the woman in the middle. My Aunt Bertha is to her left. She is holding my cousin Bob. My Aunt Carol is the youngest woman on the right. The goofy kid in the left-hand corner is my cousin Jim.


My hometown is celebrating the 64th Annual West Point Iowa Sweet Corn Festival this weekend. The festivities begin on Wednesday with the Shuckfest where 17 to 20 tons of sweet corn is shucked in preparation for the festival.

The whole community turns out to help shuck the corn which is accomplished in just a little over one hour or so. The corn is then steamed, dipped in butter, and served free to the public over the course of the four day festival which runs from Thursday through Sunday.

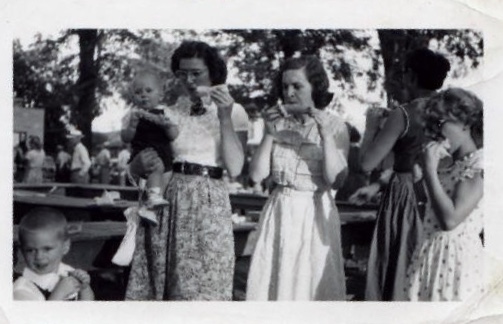
The Sweet Corn Festival is a time for reunions and homecomings. Many class and family reunions coincide with the festival weekend and the festival is the time when many former residents return for a visit. If you grew up in West Point, you know that the Sweet Corn Festival is the highlight of the year.

IMG_3886
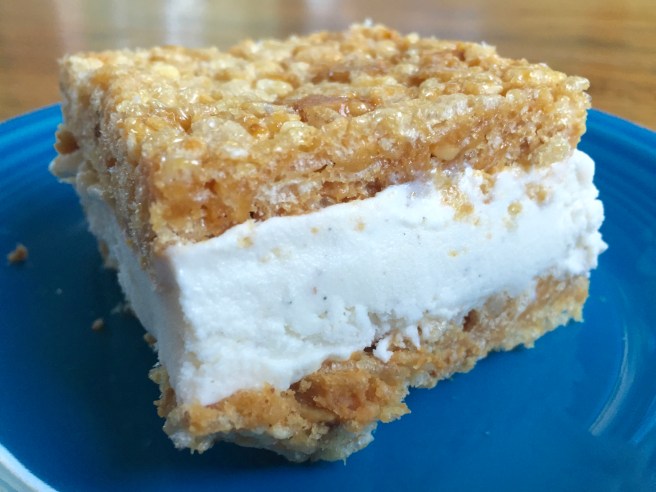
My childhood home is about a half a block from the city square where the festival is held so the weekend saw a lot of visitors at our house. There was food galore at our house because you never knew who would be stopping by and my mother would have been embarrassed if she didn’t have something to offer. My favorite thing that my mother would make for the festival weekend were her Peanut Butter and Rice Krispie Ice Cream Treats.

I could not make it back to West Point this weekend for the festival, but I did make these treats. I thought of my my mom a lot.

Here is her  recipe:

Loretta’s Peanut Butter Rice Krispie Ice Cream Treats

Ingredients

1/2 C corn syrup
1/2 C peanut butter (I prefer chunky)
4 C Rice Krispies
1 quart vanilla ice cream, slightly softened

Directions

In large bowl, stir together corn syrup and peanut butter. Add cereal and stir until well coated.

Press one half the mixture firmly and evenly into buttered 8 x8 pan and the other half in a second buttered 8 x 8 pan. A large square of waxed paper will help to press the rice crispy mixture. Place in freezer until firm, about 15 minutes.

Spread one half with softened ice cream.

Cut the second pan of Rice Krispies into the size of portions you want and place it on top of ice cream. This will help when you are cutting the treats after refreezing.

Cover pan with aluminum foil and return to freezer to harden ice cream again; 2 – 4 hours.

Advertisement

Cast Iron Skillet Peach and Pecan Cobbler

peaches

A cast iron skillet is the most versatile piece of cookware you can own. You can use it on the stovetop, in the oven, over a campfire, or even on a grill. You can fry in them, make casseroles in them, or even bake in them. I will make corn bread in nothing but a cast-iron skillet.

Here is a recipe I created for a Cast Iron Skillet Peach and Pecan Cobbler. I baked mine on my gas grill. The directions I am sharing are for an oven. Yeah, I include a little rye whiskey in the recipe. You can use bourbon or omit whiskey if desired. Increase lemon juice to three tablespoons if omitting.

Cast Iron Skillet Peach and Pecan Cobbler

Ingredients

Topping

1 cup all-purpose flour
cup packed light brown sugar
½ teaspoon kosher salt
½ cup chilled unsalted butter, cut into pieces

Filling

cups pecans
2 tablespoons unsalted butter, room temperature
pounds peaches, cut into ½-inch wedges, approximately 6 to 8 depending on size
½ cup packed light brown sugar
¼ cup granulated sugar
1 Lemon, juiced
1 Tablespoon rye whiskey or bourbon
1/8 teaspoon ground ginger
1/8 teaspoon ground coriander
1/8 teaspoon cumin
1/8 teaspoon nutmeg
½ teaspoon kosher salt

Directions

Topping

Add flour, brown sugar, and salt in a medium bowl and mix until well combined. Add butter. Rub the butter into the dry ingredients with your fingers until clumps form and no dry spots remain.

Filling

Preheat oven to 350°.

Toast pecans in the oven on a rimmed baking sheet until slightly darkened in color about 8 to 10 minutes. Shake the baking sheet tossing the pecans every couple minutes to prevent from burning. Cool slightly then chop coarsely.

Add the pecans, peaches, brown sugar, granulated sugar, lemon juice, rye whiskey, ginger, coriander, cumin, nutmeg and salt in a large bowl and mix well ensuring peaches and pecans are well distributed.

Grease the bottom and sides of a 10″ cast-iron skillet with unsalted butter. Pour peach mixture into skillet. Crumble the topping over filling.

Bake until topping is golden brown and juices are thick and bubbling around the edges about 30 to 40 minutes.

Serve warm or at room temperature with or without vanilla ice cream.

Rhubarb Crisp

IMG_3150
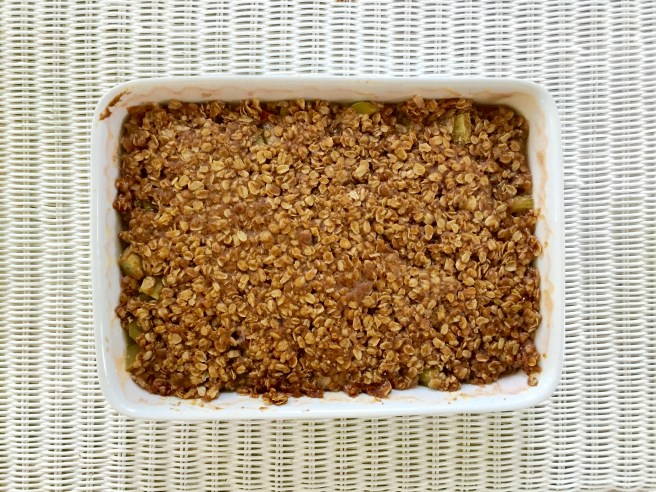
Rhubarb has an identity crisis. Botanically it is a vegetable, however most people think of it as fruit. Even the United States government defines it as a fruit following a 1947 customs court ruling. Regardless, I enjoy it’s tangy, mouth puckering goodness.

IMG_3165One of my favorite ways to enjoy rhubarb is baked in a crisp. My mother would make them frequently in the spring.

There is nothing better than a slightly warm serving of rhubarb crisp topped off with some fresh heavy cream. My mother grew up on a farm with dairy cows and I was often reminded of her having to milk thirty-five of them twice a day by hand.

I made a rhubarb crisp today and thought of my mother and those thirty-five milk cows.

Here is what I did:

Rhubarb Crisp

Ingredients

3/4 Cup sugar
3 Tablespoons cornstarch
3 pounds of rhubarb chopped into about 1 inch pieces (8 cups)
2 1/2 Cups old fashioned rolled oats (Quick cooking work too.)
1 Cup packed brown sugar
1 Cup melted butter
2/3 Cup all purpose flour
2 Teaspoons ground Cinnamon

Directions

In a large bowl, combine sugar and cornstarch. Add rhubarb and toss to coat. Spoon into a 12″ x 9″ baking pan.

In a small bowl, combine the oats, brown sugar, butter, flour and cinnamon until well mixed.

Spread over rhubarb. Bake at 350° for 50 – 55 minutes or until bubbly and fruit is tender. Let cool, but best served when still slightly warm.

A Fun, Decadent Dessert: Baked Hot Chocolate

image
Baked Hot Chocolate right out of the oven.

image
Baked Hot Chocolate served with lightly sweetened whipped cream.

I love the holidays filled with fun, festivity, and food. It’s a time when I have an excuse to cook for friends and family. What better way to add some fun and festivity to your holiday meals than to make your dessert out of chocolate.

This quick and easy dessert is both decadent and delicious. Although you bake these in individual mugs it is not really baked hot chocolate and I can’t help but like the play on words for this dessert. Part very moist brownie, part pudding, this is one of the most amazing dessert concoctions I have ever created. They are relatively quick, very easy, and extremely rich – the most perfect way to end just about any meal.

This recipe will make four desserts.

Ingredients

9 ounces high-quality semisweet chocolate, finely chopped
6 tablespoons unsalted butter, cut into cubes
4 large eggs
¼ cup granulated sugar

Lightly sweetened whipped cream, to taste (optional)

Directions

Preheat oven to 350 degrees. Arrange four 1-cup ovenproof coffee cups, mugs or 8-ounce ramekins in a baking or roasting pan.

Melt chocolate and butter together in a double boiler set over barely simmering water. Whisk occasionally until smooth. Remove from heat and set aside.

Stir eggs and sugar together in a mixing bowl, then set bowl over simmering water. Stir until warm to the touch.

Remove from heat. Beat egg mixture with an electric beater until light and fluffy, 3-5 minutes. Gently fold egg mixture into chocolate mixture.

Spoon batter into cups. Add enough very hot water to baking pan to come halfway up sides of cups. Bake until the tops lose their glossy finish, 15-20 minutes. Carefully remove cups from pan.

Serve warm or at room temperature with a generous dollop of whipped cream, if desired. Puddings may be refrigerated for up to one day. To reheat, bring them to room temperature and then set in a 350-degree oven until warm, about 5 minutes.

A bit of an unusaul tart: Pecan Brie Tart

Think of a tart and you usually think of a sweet, fruit filled creation. However, the history of tarts shows a more savory beginnings. Tarts in medieval times traditionally were meat filled pastries. Over time they transformed into the sweeter fruit and custard desserts we find today.

This weekend I was given a challenge to make a dessert that contained the following three ingredients: butter, whipped cream, and brie. The first two were easy. It was the brie that caused consternation. In the end, I think I came up with an excellent sweet and savory tart. Here is what I did. This recipe will make four, four inch individual tarts.

The tart shell

Having never made a tart before, I went in search of a quick and easy tart shell recipe. I settled on David Lebovitz’s adaptation of Paule Caillat’s tart dough recipe. Caillat teaches the art of French cooking in Paris. Her recipe is a little unconventional as she begins by browning the butter and the dough is mixed while the fats are hot rather than cold as is typical. This recipe will make enough dough for a 9 inch tart pan. I used four smaller 4 inch tart pans to make individual tarts.

Ingredients

90 g (3 ounces) unsalted butter, cut into pieces
1 tablespoon vegetable oil
3 tablespoons water
1 tablespoon sugar
1/8 teaspoon salt
150 g (5 ounces) flour

Preheat the oven to 410º F.

In a medium-sized ovenproof bowl, such as a Pyrex bowl, combine the butter, oil, water, sugar, and salt.

Place the bowl in the oven for 15 minutes, until the butter is bubbling and starts to brown just around the edges.

When done, remove the bowl from oven (and be careful, since the bowl will be hot and the mixture might sputter a bit), dump in the flour and stir it in quickly, until it comes together and forms a ball which pulls away from the sides of the bowl.

Transfer the dough to a 9-inch tart mold with a removable bottom and spread it a bit with a spatula.

Once the dough is cool enough to handle, pat it into the shell with the heel of your and, and use your fingers to press it up the sides of the tart mold. Reserve a small piece of dough, about the size of a raspberry, for patching any cracks.

Prick the dough all over with the tines of a fork about ten times, then bake the tart shell in the oven for 15 minutes, or until the dough is golden brown.

Remove from the oven and if there are any sizable cracks, use the bits of reserved dough to fill in and patch them.

Let the shell cool before filling.

The filling

Ingredients

8 oz good quality brie (I used a triple cream brie)
½ cup finely chopped pecans
½ cup brown sugar (packed)
3 ounces whiskey (I used Templeton Rye)

Directions

Cut brie into 4 equal wedges and place in tart shell.

In a saucepan, heat pecans, sugar and whiskey over medium heat, stirring until bubbly. (I chose Templeton Rye because I thought the nutty, buttery flavor of the whiskey would add to the flavors of the brown sugar and pecans. I was right.)

Reduce heat and simmer for 1 minutes or until thickened.

Working quickly, spoon pecan mixture over Brie.

Bake in 375?F oven for 10 minutes or until hot and bubbly.

Because my challenge called for whipped cream, I simply whipped some heavy cream and added a dollop on top of the tarts. They would have been just as delicious without the whipped cream.

A note on whipped cream. For the life of me, I cannot understand why people buy Cool Whip when in under five minutes you can have real whipped cream without unpronounceable chemicals. All you need is to make sure your cream is very cold and a good quality whisk. It also helps to chill the bowl a few minutes too so it is also cold. Poor the very cold cream into the chilled bowl and whisk away. You will be amazed at how quickly you will have a very light and airy whipped cream.

Birthday Cake!

A few weeks ago I posted that my daughter Elizabeth asked me for my mother Loretta’s sponge cake recipe. I also mentioned that it was my favorite cake and that I always asked her to make me one on my birthday; just a plain sponge cake with no frosting.

Yesterday was my 50th birthday. My daughter Elizabeth surprised me with an unfrosted sponge cake. Loretta, you would have been proud. Yes, the picture is the cake she baked for me with the one piece I cut out for myself.

Thank you Elizabeth! I love you!

Here is a recap of the recipe:

Ingredients

3 C sifted cake flour
2 t. baking powder
1/2 t. salt
10 to 12 egg yolks
2 C sugar
1 C cold water
1 t. vanilla
1/2 t. lemon extract

Directions

Sift cake flour, baking powder, and salt together three times. Beat egg yolks in large bowl of mixer on high speed for 5 minutes until thick and fluffy. Gradually beat in sugar. Turn to low speed and beat in cold water, vanilla, and lemon extract. Then sprinkle in flour mixture quickly but not all at once. Beat only until blended.  Pour into 10” diameter, deep angel food tube pan. Bake at 350° for about 1 hour.

Just “desserts” — Grilled Peaches and Ice Cream

Here is an insanely easy dessert that is a perfect end to a day of grilling. Serve these with a white port or icewine and your guests will be talking about this dessert for a long time. You might call these S’mores for adults. Here is all you need:

Ingredients

Peaches – I prefer white flesh peaches. Make sure they are not too ripe.
Brown sugar
Vanilla ice cream

Directions

Heat grill to medium heat. Quarter peaches and sprinkle with brown sugar. Place peaches on grill skin side down. Grill approximately two minutes. Flip peaches to one of the cut sides and grill an additional two minutes. Flip to other cut side and grill another two minutes. Remove from grill. Place three to four peach slices in a bowl and scoop ice cream on top. Enjoy!

Crème Brûlée – So simple, so rich, and always praised!

This is the second recipe from the prom dinner I made for my son Gregory and his friends.

The English, Spanish, and French all take credit for the creation of this wonderful dessert. Thankfully for us the French translation of the English name for this dessert is the one that became common place. Burnt cream just doesn’t have the same appeal. The Spanish name for this is crema catalana.

Ingredients

8 egg yolks
1/3 cup granulated white sugar
2 cups heavy cream
1 teaspoon pure vanilla extract
¼ cup granulated white sugar (for the caramelized tops)

Directions

Preheat oven to 300ºF. In a large bowl, whisk together egg yolks and sugar until the sugar has dissolved and the mixture is thick and pale yellow. Add cream and vanilla, and continue to whisk until well blended.
Divide mixture among 4 to 6 4.5 inch, flat ramekins. Place ramekins in a large pan and then create a water bath by filling the pan with hot water until the water comes up to just below the top of the ramekin. Bake until set around the edges, but still loose in the center, about 50 to 60 minutes. Remove from oven and leave in the water bath until cooled. Remove cups from water bath and chill for at least 2 hours or up to 2 days. When ready to serve, sprinkle about 2 teaspoons of sugar over each custard. For best results, use a small, hand-held torch to melt sugar. If you don’t have a torch, place under the broiler until sugar melts. Re-chill custards for a few minutes before serving.

Here are a few other tips to help make the best crème brûlée:

Eggs – This is one recipe where the volume of eggs makes some difference. Use large grade A. Make sure they are well chilled before separating. Chilled eggs are easier to separate as the yolks will be firmer.

Cream – Use only heavy whipping cream.

Vanilla extract – Use real vanilla extract and not imitation. If you can, use a Madagascar Bourbon extract. It should be available in most specialty gourmet shops.