Chickpeas – A great snack

IMG_3560
Oven roasted chickpeas.

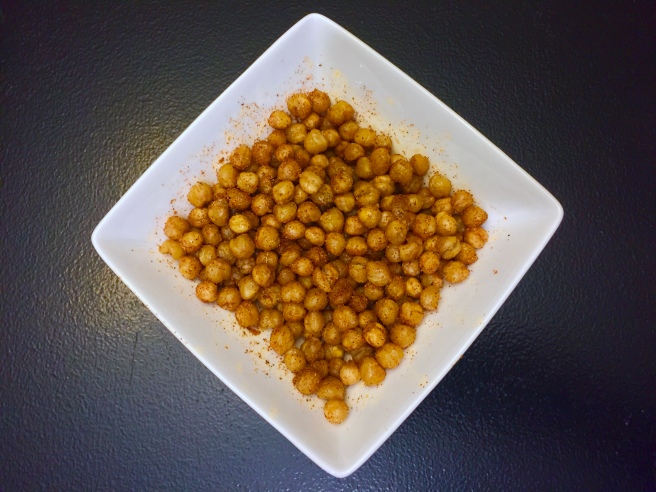
Whether oven roasted or fried, chickpeas make a great snack and either method of making them is simple. Each method has its pluses and minuses. The oven roasting method uses less oil if that is a concern. Fried chickpeas tend to stay crispier while the oven roasted can become soft in the center after they have cooled. I provide both methods below. I would suggest trying them both to see which you prefer.

I also suggest playing around with the seasoning. Chickpeas take on seasoning well. I list a smoky, slightly spicy seasoning mix, but you can use most any. My daughter suggests cinnamon and sugar for a sweeter treat.

Here is what I did:

Oven Roasted Chickpeas

Ingredients

2 15.5 ounce cans chickpeas
1 Tablespoon olive oil
1 Teaspoon garlic powder
1/2 Teaspoon smoked paprika
1/2 Teaspoon Hungarian paprika
1/2 Teaspoon cumin
1/2 Teaspoon fine sea salt

Directions

Heat the oven to 450°F. and place an oven rack in the middle of the oven.

Drain and rinse the chickpeas thoroughly under running water.  Open the cans of chickpeas and pour the chickpeas into a strainer in the sink. Rinse thoroughly under running water.

Dry the chickpeas with a clean dishtowel or paper towels. They should look matte and feel dry to the touch. I like to let them air dry for 20 to 30 minutes if I have time. You can remove any chickpea skins that come off while drying, but otherwise don’t worry about them.

Toss the chickpeas with olive oil making sure they are evenly coated and spread the chickpeas out in an even layer on a baking sheet.

Roast the chickpeas in the oven for 20 to 30 minutes, shaking the pan every 10 minutes so they brown more evenly. Don’t be surprised to see a few chickpeas pop. The chickpeas are done when golden and slightly darkened.

Place the chickpeas in a serving bowl and sprinkle the spices over the chickpeas. Stir to coat evenly. Serve immediately.

Fried Chickpeas

Ingredients

2 15.5 ounce cans chickpeas
Vegetable oil
1 Teaspoon garlic powder
1/2 Teaspoon smoked paprika
1/2 Teaspoon Hungarian paprika
1/2 Teaspoon cumin
1/2 Teaspoon fine sea salt

Directions

Drain and rinse the chickpeas thoroughly under running water.  Open the cans of chickpeas and pour the chickpeas into a strainer in the sink. Rinse thoroughly under running water.

Dry the chickpeas with a clean dishtowel or paper towels. They should look matte and feel dry to the touch. I like to let them air dry for 20 to 30 minutes if I have time. You can remove any chickpea skins that come off while drying, but otherwise don’t worry about them.

Pour enough vegetable oil into a 12″ sauté pan to cover the bottom and heat over medium-high heat. It is best to fry the chickpeas in two batches. Carefully add half the chickpeas to the skillet and fry them until golden brown, about 5 to 10 minutes. Remove the chickpeas with a slotted spoon and place them on paper towels to drain briefly. Add additional oil if needed and fry the other half of the chickpeas.

Place all the chickpeas in a serving bowl and sprinkle the spices over the chickpeas. Stir to coat evenly. Serve immediately.

Advertisement

Sautéed Snow Peas with Garlic

IMG_3541

Most Sundays, I hit up the Hiawatha Farmers’ Market in the 10th Avenue parking lot of Guthridge Park. It is my favorite farmers’ market in the Cedar Rapids area not only because it is conveniently close to home but also because it is just the right size. You can really get to know the vendors.

Last Sunday I picked up some snow peas from the friendly folks at Wittenburg’s Farm located just up the road in Springville, Iowa. I thought these would be a great side with the tomato and basil salad and mini-Hasselback potatoes made with other produce purchased from them.

This side comes together and is ideal to make the last minute before sitting down to eat. If you are serving a steak entree as I did, it can be made while the meat is resting.

Here is what I did:

Sautéed Snow Peas with Garlic

Ingredients

2 Cups fresh snow peas, washed, trimmed, and dried
2 Cloves fresh garlic, minced
2 Tablespoons olive oil
Fleur de sel or other finishing salt

Directions

Heat skillet or preferably wok over medium-high heat. Add oil and heat until shimmering. Add garlic and sauté until just beginning to brown, about 1 minute. Add snow peas and sauté constantly stirring until bright green yet still crisp, about 5 minutes. You do not want to over cook the snow peas as they will turn dull and become limp.

Remove from heat, move to serving bowl, and sprinkle with fleur de sel. Serve immediately.

Beef Shoulder Tender Sandwich

IMG_3340Forget using a rib eye or sirloin, and don’t even think about using an expensive beef tenderloin for making a delicious steak sandwich when there are less expensive, more tender, and beefier tasting options available such as the beef shoulder tender.

Zepplins is a restaurant not far from our house that we frequent with my mother and father-in-law. They have a sandwich on their menu my father-in-law and I like very much called the Stockyard Steak. We call it delicious.

The description on the menu reads “Char-broiled chuck tender, wild mushrooms, Swiss cheese, arugula & cracked pepper aioli on ciabatta.” It’s so good I had to recreate it. I have made this sandwich now a couple of times. The only difference is I use a shoulder tender rather than the chuck tender used by Zepplins. They are similar cuts from the same general area of the cow, but the shoulder tender is rated more tender. As a matter of fact, beef shoulder tender is rated as the second most tender cut of beef trailing only the beef tenderloin. In addition, the cut has a much beefier taste and is half the cost of beef tenderloin. Another very similar cut coming from the same general area you could use for this sandwich is the flat iron.

All three of these cuts should only be cooked no further than medium-rare. Cooking any of these cuts beyond medium-rare will cause the muscle to tighten up and become tough.

Here is what I did:

Beef Shoulder Tender Sandwich
(Makes two sandwiches)

Ingredients

1 Beef shoulder tender (approximately 8 to 10 ounces)
Kosher salt
Fresh ground pepper
4 Slices ciabatta approximately 1/2″ thick from a 12″ loaf
Olive oil
4 Tablespoons black pepper roasted garlic aioli (recipe follows)
1 Cup approximately arugala
3 Slices Swiss cheese
4 ounces of mushrooms sliced thin (your choice; oyster, chanterelle, shiitake, cremini)

Directions

Preheat grill to medium-high heat.

About 30 minutes prior to grilling, take beef shoulder tender out of the refrigerator and allow to come to room temperature. Then season with Kosher salt and fresh ground pepper and grill beef shoulder to rare or medium-rare; about 4 to 5 minutes per side for rare, 6 to 7 minutes per side for medium-rare. Remove from heat, tent with foil, and let rest at least 5 minutes before slicing.

Prepare the ciabatta and mushrooms while the beef is coming to room temperature. Brush one side of the ciabatta with olive oil and place under a broiler until toasted. Flip and lightly toast the side without olive oil and set aside. This could also be done on the grill if you prefer.

Heat a tablespoon or two of olive oil in a skillet. Sautée mushrooms until softened they begin to slightly brown. Lightly season with Kosher salt and fresh ground pepper and set aside.

Assemble the sandwich. Place two slices of toasted ciabatta on work surface with the olive oil side down. Spread aioli on these sides. Top with arugala and then Swiss cheese. Next place sliced beef tenderloin tender slices on top of cheese and mushrooms on top of beef. Top with remaining toasted ciabatta slices olive oil side up and serve.

Black Pepper Roasted Garlic Aioli

Ingredients

1 Large egg yolk
2 Teaspoons fresh lemon juice
1/2 Teaspoon Dijon mustard
1/4 Cup extra-virgin olive oil
3 Tablespoons vegetable oil
2 Roasted garlic cloves
Fresh ground black pepper

Directions

Whisk together yolk, lemon juice, and mustard in a medium sized bowl. Combine oils and add, a few drops at a time, to yolk mixture, whisking constantly, until all oil is incorporated and mixture is emulsified. Should your mixture separates, stop adding oil and continue whisking until mixture comes together, then resume adding oil.

Mash the roasted garlic to a paste. Whisk in garlic paste and black pepper into above mixture. Cover and refrigerate until ready to use. Aioli will last about a week in the refrigerator.

Roasted Radishes with Rosemary Brown Butter

IMG_3314

I love the peppery zing of radishes and look forward to them in Spring. They’re great for snacking, sliced thinly on salads, and always find their way onto a crudités tray, but have you ever roasted them? If not, you don’t know what you’re missing.

I am a big believer in the transformative power of roasting almost any vegetable and radishes are no exception. One problem with radishes is that late in the season they tend to get hot. Roasting them can help tame this hotness.

I like to use slightly larger radishes when I roast them. I also like to mix up the variety by combining various colors of globe and white icicle, but any one type will work. This recipe also utilizes some of the radish leaves. Contrary to popular believe, radish greens are edible and quite tasty. Radish leaves do not keep more than a couple days, but you might also consider adding the leftover leaves to your salad mix.

This recipe also calls for browned butter. Browned butter is easily made, but can go from browned to burnt in seconds if not watched. Always use a heavy bottom, light colored sauce pan and begin on medium-low heat. Using a light colored skillet like a stainless still will allow you to better see the color change. I also suggest near constant stirring to prevent the milk solids from sticking to the bottom of the sauce pan and burning.

Here is what I did:

Roasted Radishes with Rosemary Brown Butter

Ingredients

1 bunch radishes (approximately 8 to 12 depending on size) trimmed, reserve some leaves
2 Tablespoons olive oil
1 Teaspoon Kosher salt
3 Tablespoons unsalted butter
2 Tablespoons fresh rosemary, finely chopped
Pinch of finishing sea salt

Directions

Preheat oven to 425°F.

Wash and trim radishes reserving the radish greens. Radish leaves can be gritty. Rinse thoroughly in cold water. Spread them out on paper towel and let them dry completely before removing the tougher center rib and roughly chopping. Set aside.

Cut the radishes in half and toss them with olive oil and salt in a medium mixing bowl.

Place the radishes cut side down on a large baking sheet. Roast in the oven for 25-30 minutes until cut sides begin to brown and can easily be pierced with a knife.

About five minutes before the radishes finish roasting, prepare the brown butter sauce. You want it hot to wilt the radish tops. Begin by melting butter in a heavy bottom, light colored sauce pan. Using a light colored skillet like a stainless steel will allow you to better see the color change.Butter can go from browned to burnt in seconds. Stir with a wooden spoon and after about 4-5 minutes add the rosemary. The butter may crackle and foam again but you will notice an almost immediate release of rosemary fragrance. Increase heat to medium and continue to cook until it turns a beautiful, deep brown color, about another 3-4 minutes  Remove from heat.

Place the radishes and leaves in a large serving bowl. Pour the brown butter sauce over the radishes and gently toss. Season with additional finishing sea salt if desired.

Serve immediately.

Pork Loin with Rhubarb Port Sauce

IMG_3195I mentioned recently I feel rhubarb has an identity crisis. People think it is a fruit rather than vegetable because of its tangy yet fruity flavors. This fruit mentality often relegates rhubarb to the dessert cart. There are many recipes for crisps, tarts, pies, jellies, cookies, and cakes, but not too many highlighting rhubarb for the more savory entrée.

Although I made this recipe with a pork loin, the flavors will work well with roasted turkey or chicken. I think it would complement wild game too.

IMG_3186
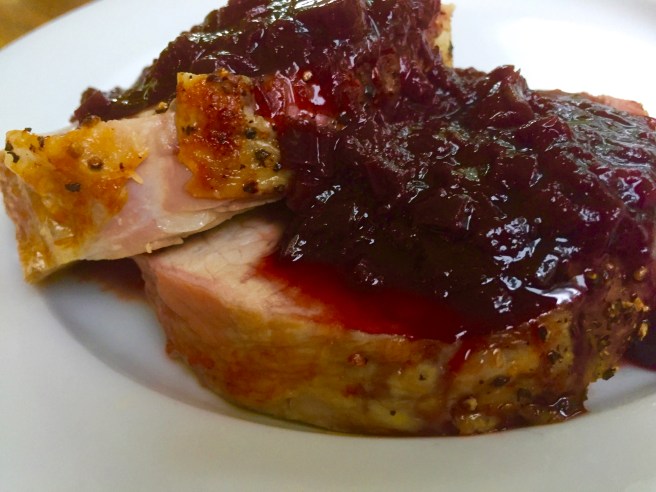
I moved rhubarb to the dinner plate with this recipe. I have frequently used cranberries to make a cranberry port sauce served with turkey at Thanksgiving and other holidays. This got me thinking. Since cranberries and rhubarb share a similar flavor profile – both tart and tangy – I should be able to substitute rhubarb for cranberries in this sauce.

While the pork was roasting, I got to work on the rhubarb port sauce. I started by chopping one pound of rhubarb into small pieces, about 1/4″ or so, that would be roughly the size of cranberries. To this, I added 3/4 cups of packed light brown sugar, 1 teaspoon of cornstarch, and 1 and 1/4 cups of ruby port. Why 1 and 1/4 cup of ruby port? Because that leaves 1/4 cup of port in a 375 milliliter bottle that the cook can then enjoy while occasionally stirring the sauce until it reduces and thickens slightly.

Time to start working on that rhubarb appetizer and cocktail. I have ideas.

Here is what I did:

Pork Loin with Rhubarb Port Sauce

Ingredients

3 to 5 pound boneless center cut pork loin
Kosher salt
Fresh ground black pepper
1 Pound chopped rhubarb (approximately 1/4″)
3/4 Cup packed light brown sugar
1 1/4 Cup ruby port
1 Teaspoon cornstarch

Directions

Prepare grill for indirect grilling, heat to 325°F.

Allow pork loin roast to come to room temperature and then season all sides with kosher salt and pepper. Roast until internal temperature of 145° F. Plan on approximately 20 minutes per pound for the roast to come to this temperature. Pull roast and let rest at least 5 minutes before slicing.

While the pork loin is roasting, add the rhubarb, brown sugar, port and cornstarch to a 3 quart saucepan. Bring to a low boil and then simmer until liquid is reduced to about half and the sauce begins to thicken; about 45 minutes. The rhubarb will be fairly broken down yet still slightly chunky. The sauce will thicken even more as it cools.

Slice pork loin into approximately 3/4″ slices and spoon rhubarb port sauce over loin slices and serve.

Rhubarb Crisp

IMG_3150
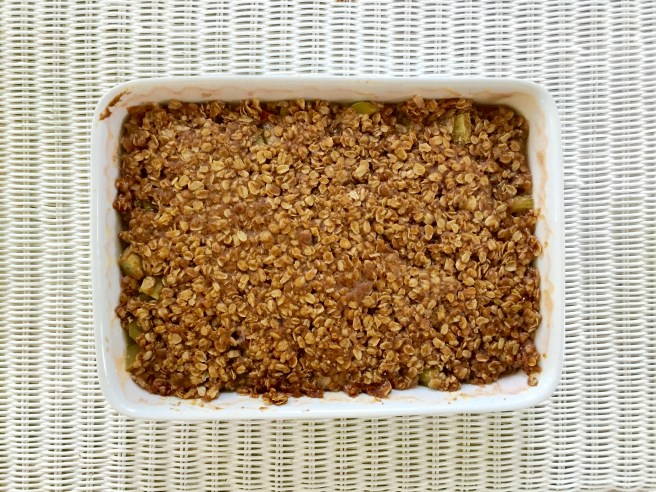
Rhubarb has an identity crisis. Botanically it is a vegetable, however most people think of it as fruit. Even the United States government defines it as a fruit following a 1947 customs court ruling. Regardless, I enjoy it’s tangy, mouth puckering goodness.

IMG_3165One of my favorite ways to enjoy rhubarb is baked in a crisp. My mother would make them frequently in the spring.

There is nothing better than a slightly warm serving of rhubarb crisp topped off with some fresh heavy cream. My mother grew up on a farm with dairy cows and I was often reminded of her having to milk thirty-five of them twice a day by hand.

I made a rhubarb crisp today and thought of my mother and those thirty-five milk cows.

Here is what I did:

Rhubarb Crisp

Ingredients

3/4 Cup sugar
3 Tablespoons cornstarch
3 pounds of rhubarb chopped into about 1 inch pieces (8 cups)
2 1/2 Cups old fashioned rolled oats (Quick cooking work too.)
1 Cup packed brown sugar
1 Cup melted butter
2/3 Cup all purpose flour
2 Teaspoons ground Cinnamon

Directions

In a large bowl, combine sugar and cornstarch. Add rhubarb and toss to coat. Spoon into a 12″ x 9″ baking pan.

In a small bowl, combine the oats, brown sugar, butter, flour and cinnamon until well mixed.

Spread over rhubarb. Bake at 350° for 50 – 55 minutes or until bubbly and fruit is tender. Let cool, but best served when still slightly warm.

Lomo al Trapo: Salt-Crusted Beef Tenderloin Grilled in Cloth

I first heard of Lomo al Trapo about four years ago when I read an issue of Bon Appétit Magazine where Steven Raichlen described this South American method of cooking beef tenderloin. Lomo al trapo literally translates to “beef tenderloin in a towel.” It’s made by wrapping a beef tenderloin in a thick crust of salt inside a towel, tying it up, and throwing it directly on a fire until it’s cooked.

It sounds crazy, but it’s one of the easiest, most foolproof, delicious, and wickedly cool methods of cooking beef I’ve ever seen. Do this for a dinner party and your guests will at first think you’re crazy, but once that juicy slice of beef is on their plate and in their mouths they’ll think you’re a genius. Okay, maybe a mad genius. All it takes is beef, salt, a few seasonings, a towel, twine, and fire.

This post is more a description of a technique than it is a recipe. Just follow the basic steps outlined here and use your imagination.

IMG_3101
Wet towel with layer of kosher salt, fresh oregano and thyme. The salt should be about 1/4 inch thick.
IMG_3102
Fold the towel ends in like you would a burrito. Keep compressing the roast as you roll it to ensure good salt contact.
IMG_3104
Roast tied and ready for the fire.
IMG_3110
Nestle the roast directly in the coals making sure it is full contact.
IMG_3113
Pull the roast at about 95°F to 100°F and let it rest until it comes up to 125°F to 130°F. This will give you very nice rare cooked roast. Beef tenderloin is always better when cooked to rare or medium-rare. 
IMG_3114
Crack open the hardened cloth and salt shell to reveal a beautifully cooked tenderloin.
IMG_3127
Beautifully cooked tenderloin roast

Start by soaking a clean, kitchen towel in water. Do not use a towel that you value; you’re not getting this back. I purchase packs of six terry cloth bar towels that measure 16″ square at Target for about $4.00.

Ring out the towel and lay it out on a flat surface. Then spread a thick layer of kosher salt.

Add some fresh or dried herbs if you would like and then begin rolling the tenderloin up in the towel. When you get to the point where the towel will begin to roll under the salt, pull the towel back and continue to roll. You want the beef to be in full contact with the salt. Fold the ends of the towel in like a burrito and then complete the roll. Be sure to compress the roll as you go. You want this tight.

Once the tenderloin is completely rolled. Take some cotton twine that you have also soaked in water and tie the towel to the roast. I start with a tie that runs lengthwise and holds the ends together. Next, I tie the roast about every two inches.


Place the beef tenderloin package directly into the coal bed. I like to move it around a bit to get it nestled into the coals. I like to use lump charcoal for this as I believe it is cleaner. You can use charcoal briquets if you would like. Let this sit in the coals for about 10 minutes, flip and give it another 8 minutes or so.

Pull the roast out of the fire when an instant read thermometer reads 95°F to 100°F. The heat from the hot salt will continue to cook the roast. I pulled this one right before it hit 100°F and just a few minutes later it was approaching 104° After about 8 minutes the roast will be 125-130°F .


Once the roast comes to the desired temperature, crack open the hardened cloth and salt shell. Use a pastry brush to brush off any excess salt. I recommend saving some of the excess salt to use to season any accompanying sides you may be serving. The salt will have a nice smoky flavor. Discard the remaining shell.


Move the roast to platter and carve to about 1 1/2 to 2 inch slices. The end pieces will be slightly more done. Open a nice dry Malbec and enjoy!


Here is what I did:

Lomo al Trapo: Salt-Crusted Beef Tenderloin Grilled in Cloth

Ingredients

1 1/2 to 2 pound center cut piece of beef tenderloin, trimmed of all fat and silver skin
Kosher salt (Approximately 2 cups)
Fresh or dried herbs like oregano and thyme

Special equipment:
1 piece of clean cotton cloth, approximately 16 inches square, soaked in cold water and wrung out
Twine

Directions

Prepare a charcoal grill lighting a large chimney of lump charcoal. You should have a good layer of lump charcoal covering the bottom of your grill.

Spread the cotton cloth on a work surface. Spread the salt out on top of the cloth to form a layer 1/4 inch thick that extends to within 1 inch of the edge of the cloth. Place the fresh herbs or sprinkle the dried herbs evenly over the salt.

Place the beef tenderloin on top of the salt and herbs. Roll the cloth and salt around the tenderloin trying to maintain a compact roll. As the cloth begins to roll up on itself, pull the cloth back a few inches to ensure that the tenderloin completely encased in salt. Fold the ends in like you would rolling a burrito and finish the roll. When the roll is complete, first tie the roast lengthwise and then about every two inches.

Rake the charcoal out into an even layer at the bottom of the grill. Lay the wrapped tenderloin right on the coals. Moving it around a little as you place it to ensure that it is complete contact with the charcoal. The cloth will more than likely catch on fire so do not become alarmed. Grill for 9 to 10 minutes. Using long handled tongs, gently turn the tenderloin package over and grill for 8 minutes or until an instant read thermometer reads 95° to 100°F.

Remove the roast from the coals and let rest. The hot salt will continue to cook the roast. Leave the thermometer in the roast until it reaches the desired doneness: 125 – 130°F for rare; to medium-rare, 140° – 145°F. This will take as little as 10 minutes.

Tap the tenderloin hard with the back of a large, heavy chef’s knife. The burnt shell should crack and easily come off. Brush any excess salt off the tenderloin with a pastry brush. Transfer the tenderloin to a clean platter, cut it into 1 1/2 to 2 inch thick pieces and serve immediately.

Fiesta Pork Chops

This time of year can be a challenge. School is ending and there are a million end of the year activities going on. On top of that, summer practices and ballgames are beginning, the lawn needs to be mowed and all the household chores still need to get done. It can be a real challenge to get dinner on the table, but this recipe can help. It’s just a few ingredients and clean up is easy since it is all made in one skillet. Dinner will be on the table in under 45 minutes from start to finish.

IMG_3074
Fiesta Pork Chops – Pork chops topped with black beans and salsa all made in one skillet so cleanup is minimal.

I’m the first to admit that I will take a short cut in the kitchen if I need to. This recipe calls for canned black beans and jarred salsa. Soaking and cooking beans is not the most difficult thing in the world, but it takes planning ahead. I have no problems using canned beans on occasion and I always make sure my pantry is stocked with several different types.

The pork chops I like to use in this dish are bone-in chops at least three-quarters of an inch thick. You can use boneless if you like, but I think the bone helps develop a deeper flavor. A thinner chop can also be used but it will cook much faster and the liquids may not have as much time to cook down.

Here is what I did:

Fiesta Pork Chops

Ingredients

4 bone-in thick-cut pork chops
Ground black pepper
2 tablespoon oil
1 (15 ounce) can black beans, with liquid
1 cup salsa
3 tablespoon chopped fresh cilantro

Directions

Season pork chops with pepper.

Heat oil in a large skillet over medium-high heat. Sear pork chops 3 to 5 minutes per side until golden browned.

Stir about 2 tablespoons of the chopped cilantro into the salsa reserving the remainder. Pour beans and salsa over pork chops. Continue cooking over medium-high heat until liquid is bubbling, then reduce heat to medium-low, loosely cover the skillet, and simmer until chops are no longer pink in the center and liquid has reduced by about half; about 20 to 35 minutes.

Asparagus and Crab Stuffed Walleye

IMG_2988
Asparagus and Crab Stuffed Walleye served with a Green Bean and Radish Salad.

I like dinners that are elegant and look like you spent a lot of time preparing but actually come together quite easily and quickly. My Asparagus and Crab Stuffed Walleye is one of those meals. This entrée would be met with oohs and aahs if served at a dinner party.

I prepared this with fresh walleye however any mild tasting white fish would work well with it. What ever fish you choose, just be sure that the flavor of the fish compliments the boldness and doesn’t muddle the flavor of the crab. It pains me to say this, as I have a general dislike of the fish, but Tilapia would be a good choice for this. I like to describe Tilapia as the true chicken of the sea: bland, boring, and over farmed. I chose walleye because I believe the mild, somewhat sweet flavor works well with the crab.

Here is what I did:

Asparagus and Crab Stuffed Walleye

Ingredients

Fish
2 Walleye fillets or other white fish, skin removed
1 Tablespoon olive oil
1/2 Cup shallot, minced
2 Cloves garlic, minced
6 ounces crab lump crab meat (pouch or canned is suitable)
1/4 Cup ricotta cheese (whole milk)
1 Teaspoon Old Bay Seasoning
3 Tablespoons chives, chopped
Kosher salt
Fresh ground pepper
6 spears asparagus trimmed just a little wider than width of fillet

Lemon Butter Sauce
3 Tablespoons unsalted butter (plus a little more for buttering the baking dish)
Juice from one large lemon (Approximately 4 tablespoons)

Directions

Preheat oven to 375°F.

Heat olive oil in skillet over medium low heat and gently sautée shallots. Add garlic when shallots are translucent and just beginning to brown. Add crab meat, ricotta, Old Bay Seasoning, chives, salt, and pepper. Stir to fully blend ingredients together. Remove from heat and allow to cool.

Lay out fillets on cutting board. Check over for pin bones while patting dry. Divide crab mixture between fillets spreading evenly the whole length of the fish. Place three asparagus spears on the widest end of each fillet. Roll up the fillet beginning with the asparagus end and place the fillet seam down in a lightly buttered glass or ceramic baking dish.

Melt butter. Briefly whisk melted and lemon juice in a small bowl then then drizzle all but about two tablespoons of mixture over fillets. Sprinkle a little Old Bay Seasoning over fillets for color.

Bake crab stuffed fillets for about 20-25 minutes or until they flake easily with fork. It will depend on the size of your fish. Start checking them after 15 minutes if you have smaller fillets.

Savory Spinach Pie

IMG_2871
A slice of spinach pie

My favorite farmers’ market in the Cedar Rapids area, the Hiawatha Farmers’ Market, opened this past weekend and I stopped by to say hello to some of my friends.

This market is my favorite because it opens the earliest in the year and is the last to close in the area. It is also just the right size. It isn’t filled with the craziness of the Downtown Farmers’ Market which is more a place to be seen and not a farmers’ market. I build relations with the growers at Hiawatha which is what a market should be.

IMG_2869
Spinach pie cooling after coming out of the oven.

This visit to the year’s first market was simply to reacquaint myself with the vendors. I didn’t buy anything this visit as the offerings were mostly bedding plants. Some of the vendors have large green houses and so they were able to offer some items like lettuces and other greens as well as hot house tomatoes.

One green I am really looking forward to is fresh spinach and that got me thinking; I’m hungry for spinach pie.

Not finding any spinach at the market and a few days latter when this craving became an obsession, I did the next best thing. I went to the organic section of my grocery and bought a couple pounds of spinach. Craving satisfied.

Here is what I did:

Savory Spinach Pie

Ingredients

3 tablespoons olive oil
1 medium yellow onions, finely chopped
Sea salt
Freshly ground black pepper
2 pounds fresh spinach, larger stems removed, washed and thoroughly dried (See note)
8 ounces Gruyère cheese, grated
3 large eggs (one egg is used for an egg wash)
1 cup heavy cream
1/4 teaspoon fresh ground nutmeg
Pie crust for double crust pie

Directions

Preheat oven to 375°F.

Add the olive oil to a large skillet and sauté the onion and garlic over medium-high heat until the onion is translucent and beginning to soften. Season with salt and pepper. Add about 1/4 of the spinach, or whatever will fit in your skillet, and sauté until it cooks down. Repeat this until all the spinach is wilted. Continue cooking until most of the liquid is cooked out, about 10 to 12 minutes. Place spinach in a sieve and press the spinach to remove as much of the remaining liquid as possible. Set aside.

Whisk the cream, 2 eggs, and nutmeg together in a suitable bowl and set aside.

Fit the bottom crust in a 10″ pie pan. Layer half the spinach mixture in the bottom crust and then layer half the grated cheese. Repeat layers. Pour cream and egg mixture over spinach and cheese. Fit top crust over the pie and crimp the edges together. Beat remaining egg in a suitable bowl and brush over top crust with a pastry brush. Slit the top crust with a sharp knife to create steam vents.

Bake in 375F oven for 45 to 50 minutes and crust is golden brown. Remove from oven and allow to cool at least 30 minutes.

Note: You may substitute 2 10 ounce packages of frozen spinach for fresh. If you choose to do this, thaw and squeeze out as much liquid as possible. After you have sautéed the onion and garlic, add this to the skillet to warm though and incorporate the onion and garlic.